Saturday, January 21, 2012

A Two-fer!

Tonight's plans were dinner and a movie with the kids, but we've been snowed in.  Not that there's so much snow (maybe 2 inches), but the streets haven't been plowed.  Normally, a few inches of snow wouldn't bother me, but I'm not comfortable with the driving habits of the locals and it seems wiser to stay in this evening than tempt a slushy accident.

So what, you ask?  Here's what -

Two recipes in one day!

And this second is yummy and easy, much like most of what I make around here.  I found the recipe for No Bake Chocolate Oatmeal Cookies at Morgan Moore's fun blog.  I made them while making organic mac n cheese for the boys, and husband was doctoring a frozen cheese pizza with red bell pepper, pepperoni, and mushrooms.
Mmmm.  Fudgy.  Get the recipe from Morgan's blog!
Cook's notes:

  • I think I'll use less sugar next time.  2 cups seems like a lot, and 1/2 cup less shouldn't be too noticeable.
  • It took two tries to get 'noticeable' spelled right.
  • These cookies are a little 'loose'.  Maybe it's because they are cooled and not chilled.  I think I'll try subbing corn syrup for sugar next time.  It made the cheerio snacks nice and firm, but I need to research equivalent ratios of white sugar to corn syrup.  Oh no, math....
  • Once I get the recipe where I like it, I'll post it.

Oh - I'd better hurry before I miss Thelma unveiling the bad guy!

Scooby Dooby Doo!
Mary


Nostalgic foods

I have a favorite memory from my childhood I'd like to share.  I was walking to Roosevelt Elementary on a not-too-cold fall day (I must have been in second or third grade) and my Grandpa Tony drove up in his green station wagon to give me a fresh-made, still warm waffle sandwich.  Grandma Dorothy had made waffles fresh that morning, and the raspberry jam that summer.  I remember my delight and the delicious warmth of that waffle sandwich to this day, decades later.

I share that tradition with my boys today, but with a few updates.  I use frozen waffles instead of fresh.  We've made homemade waffles, but the boys prefer frozen, and it makes cleanup easier.  And I use whatever jelly we have on hand.  Today it's organic strawberry spread from CostCo.
Still warm!  Mmm!
There isn't really a recipe, more like assembly instructions.

Take 2 warm, fully cooked waffles.
On one, spread cream cheese.
On the other, spread jelly.
Put jelly and cheese sides together.  Eat.  Say "Mmmm".

The boys have eaten all of them and are begging for more.  Time to assemble!

Enjoy!
Mary


Wednesday, January 18, 2012

Beans! Beans! The Musical Fruit!

Tonight was taco night, the kind of night when no one is complaining about dinner.  Ah, if only every night were this agreeable.  And while no one complained, husband and I agreed that the homemade taco seasoning we normally use has so much more flavor than the Ortega packets we used tonight.  Alas, I just bought 8 packets for less than $1, so we're going to use Ortega til it's gone.  Our normal taco seasoning:
Not sure where this recipe came from, but it rocks

If you want the whole recipe, you have to scroll down
Ingredients:
1 Tablespoon Chili powder
1/4 teaspoon garlic powder
1/4 teaspoon onion powder
1/4 teaspoon crushed red pepper flakes
1/4 teaspoon dried oregano
1/2 teaspoon paprika
1 1/2 teaspoons ground cumin
1 teaspoon sea salt
1 teaspoon ground black pepper
1/2 tablespoon flour

Combine all ingredients well in a bowl with a tight-fitting lid.  Attach said lid and store for up to a few months.  To use, brown 1 pound of ground meat, drain fat.  Add three tablespoons of taco seasoning and 1/4 cup water to the hot meat in the pan over medium heat.  Stir everything together really well and bring to a boil.  Let it boil for about 1 minute to thicken everything up, and you're done.  

Notes:
  • We use it up pretty quickly, so I have no idea how long it will store for, but it's lasted for at least a month in our pantry without any flavor loss.  
  • The recipe multiplies well.  Last time I made it, I think I multiplied everything by 8 and it was great.  
  • We use beef, but I bet chicken or pork or turkey or tofu could be subbed.
  • Put it on tacos, or burritos, or a green salad, or quesadillas.  

And we love Penzey's spices, so that's where we get the raw ingredients from.  Well, we did until we moved to Utah.  I may have to become an online-only customer, which makes me a little sad because their shop in Brookfield, Wisconsin is so much fun to visit.  The first time I took oldest son there, we spent over an hour because he had to smell every spice, and every blend, and every thing.  I'll have to make a point to stop there when we head back to the midwest in July.

One more quick Mexican-inspired recipe that we love in this house - black bean salad.  I think it's more of a salsa and is great to eat with your favorite tortilla chips, but I have certainly put a healthy serving in a bowl and eaten it that way, too.  This is another recipe with unknown origins.
Nominomicon.  Food stains on the page mean the recipe is much loved.
Just in case the photo is blurry, the ingredients are
  • 1 large can of black beans
  • 1 pound plus 2.5 ounces of chopped tomato
  • 1 3/4 ounce chopped green onion
  • Cilantro to taste (from a dash to 1 cup)
  • 1/4 teaspoon chopped garlic
  • 1/4 cup plus 1/2 teaspoon balsamic vinegar
  • 2 tablespoons plus 1/2 teaspoon olive oil

Wow!  Where did I get this recipe from!?  To clarify a few ingredients...
  • Tomatoes -  make that 18.5 ounces of drained, canned chopped tomatoes, or three large fresh tomotoes, chopped.
  • Green onions - I usually finely chop the top half of a small bunch of green onions, around 5.
  • Cilantro - we like cilantro around here, so we usually medium-finely chop the leafy parts of one bunch.
  • Balsamic - how much flavor does that 1/2 teaspoon really add...?  I think it adds a lot, so make it a heaping 1/2 cup total.
  • Olive oil - again with the extra half teaspoon...  Just make it 2 heaping tablespoons total and we're good.

Ok, salsa assembly is super easy.  Ready?
Drain the black beans.  Do not rinse.  Put drained beans in a large serving bowl.
Add everything else to bowl and stir well.  
Cover and refrigerate for at least an hour, so the flavors can meet, become acquainted, make plans for a second date.  The longer it marinates, the better it gets, much like the perfect relationship (does this exist?  really?).

And now for a recipe I don't even have written down - GUACAMOLE!  Seriously easy.  You'll need:
  • 2 large, or 3 medium, ripe avocados
  • 1 bunch of cilantro, finely chopped
  • 3/4C of Your Favorite Salsa
  • Salt and pepper
Remove the skin and pit from the avocado.  
Mash the avocado in a large serving bowl - I do this by hand with a fork.
Add the cilantro and salsa to the serving bowl.  Mix well.
Salt and pepper to taste.
Serve with tortilla chips or raw vegetables.  Or spread it on your quesadilla.

Ah, and now it is bedtime for this bonzo.  G'Night all!
Mary

From Lewis Wayne Gallery


Tuesday, January 17, 2012

Hey everyone! The Milk is Done!

Feast your eyes on this!  The final product of the Drunk Milk experiment!
Golden nectar!
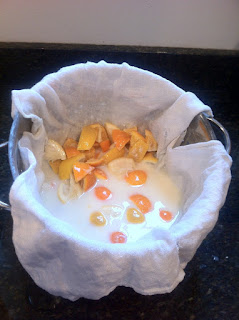
Maybe I should have posted the progress photos first and shown the finished product last, but I can't help tooting my own horn on this one.  It's sweet, creamy and very citrusy, sort of a grown up creamsicle taste.  It took hours to strain, and instead of waiting for it to be completely strained, I went ahead and poured myself a shot of the creamy goodness.  Here're the progress photos.
Open!  Strong alcohol smell.
Straining with a verrry old linen kitchen towel.  I squeezed as much of the liquid out as I could, then threw the towel and  mess away.
I was left with a thick milky liquor. I strained it through coffee filters to get rid of the milk solids.  This is the first pass.
I went through at least 10 coffee filters straining it the first time.  This is the second strain - only used three this time.
It took several hours to get the stuff strained, and it would benefit from a third straining.  I can still see some milk solids in the final product, but I don't have the patience to strain again and it tastes pretty good.  So I'm happily, contentedly done.

Would I do this again?  Probably not.  There are plenty of liquors out there that don't require almost two weeks of time and a half day's effort to get to a drinkable state.  Though this could be a good project for my drunk kitchen.  I'd love to see what she would do with this, she's so cute  :-)

I've been a little busy playing with the boys on their day off yesterday, and helping judge the school spelling bee, but I was still able to whip up these tasty peanut butter cheerio snacks.  I found them at the Kathie cooks blog.
Kathie's pictures are way nicer than this, but I'm keeping it real.

My only real project lately was cleaning the house and scrubbing toilets, and no one wants to read about that.  But I'd love to hear about your fun and exciting crafty projects.  Drop me a line!

Homework time (what IS a rhombus?),
Mary


Friday, January 13, 2012

Day 11, whaaa?!

A day overdue and the drunk milk looks the same, mostly:
Madame Charnushka say "You will get tipsy tomorrow".  Prophetic!

Purple and yellow water marbles. They do not freeze well.  Go figure.
I plan on straining the supposed amber nectar from the jar tomorrow.  Pictures will be eagerly shared as soon as possible.

I worked out today, after which I usually have a craving for something sweet.  The only sweet things we have to snack on are a big bowl of halloween candy (yes, I realize it's January), so there is really nothing for me to snack on.  What to make, what to make...?  How bout THIS!
The upper right ones were made with the thinner chocolate and almond butter, bottom left with thicker chocolate and peanut butter.
Frozen chocolate-covered nut-butter banana bites!  I used nomnomnomblog's recipe here, but even following the recipe as closely as I can (I heart tweaking), it was still really messy.  Here are some of my findings:

  • First, I needed to add waaay less liquid to the chocolate dip than the recipe called for.  I discovered this *after* following the recipe, so I had some extra chocolate left over.  Happy accident.
  • I used almond milk to thin the chocolate, so I thought it would be a good idea to use almond butter.  Not such a good idea.  Even after pouring off extra oil and stirring the heck out of it, the almond butter was still oily, which made the chocolate slide off.
  • Be sure to 'butter' all the banana slices before dipping in the chocolate.  It might even be a good idea to freeze the peanut buttered bananas before dipping, so you're dipping something hard instead of something mushy.  Personal preference on the freezing, serious suggestion on the pre-buttering.


Concoction #2:
Still contemplating a color for the table.  Maybe we should just sand and bleach it.  The options still boggle my mind.
Not quite solid so the breaks weren't perfect.  It tastes perfect, though.
Paula Deen's Pine Bark.  Wow!  I followed her recipe almost exactly, using milk chocolate chips instead of bars, and adding 2 drops of doTERRA's Wild Orange essential oil instead of almond extract.  Tweaky tweaky delicious!  The orange flavor was subtle, I would even use three or 4 drops next time for a stronger taste, reminiscent of homemade chocolate covered orange peel.  I should add that to my list of things to make, haven't made it since, well, pre-marriage.  And we're celebrating our 10 year wedding anniversary this June - go us!

  • Side note: I tried to find a recipe to post here as a possible chocolate covered orange peel candidate, but all the initial results included the white pith from the peel.  And a lot of boiling in plain water.  Blech.  The white pith needs to be removed as much as possible.  This makes the end product much, much tastier.  And the recipe I used in the past had you boil the de-pithed peel in increasingly sugarier pots of sugar water, not plain water.  I'll find the recipe and post the results when I'm done.  Honest.


Well, I have little boys that need refereeing.  Maybe I can bribe some good behavior with these treats then send them home hopped up on sugary goodness and covered in chocolate.  There are worse ways to end a Friday the 13th.

Not feeling superstitious at all,
Mary


Tuesday, January 10, 2012

Day 8 and I haven't lost track yet

On the eighth day of fermenting my drunk milk said to me...
"The future loo-ooks clou-ou-ou-ou-dy"
Just in case we haven't mind melded lately, hum that sentence and caption to the tune of The Twelve Days of Christmas.  It goes together perfectly.  Really.  And yes, I do reference Christmas the whole year long.

The milk seems to be fermenting normally, no discoloration, and the jar hasn't exploded, thankfully.  Yet.

The other, decidedly more yummy looking product of my cooking efforts is sitting on my counter top right now - vanishing oatmeal bars!  The recipe calls for raisins, but my children run screaming from raisins (force fed too many as toddlers, perhaps), so I subbed in chopped walnuts and chocolate chips.  And if you couldn't tell, I do the bar version, not the cookie version, because the bars seem to stay moister (aka yummier) longer.
Oh look!  The Ghost of Drunk Milk Past!

The craft front is quiet, which means a storm is brewing...  I have this old table, that we got for a steal about ten or eleven years ago.
Look away from the cookie crumbs
It's a solidly built table, but the plaid seats?  Yech.  I'm loving slip covers lately (Miss Mustard Seed has a great how-to here, and Screaming Meme has some adorable examples here, and Kristi at Pink and Polka Dot has really cute stuff, too), and have you heard about using drop cloths to reupholster/slipcover tired furniture?  Fabulous and inexpensive!  Love it!

Now that the seat covers are planned (drop cloth slipcovers, of course!), what to do with the yellow wood? We *could* sand it and restain in a dark wood color, but I'm afraid that the dark wood trend is coming to a close.  I'm seeing the most interesting (in a good way) painted wood furniture all over the internets and DIY blogs.  And our neighbor painted an old thrift store table and chairs a nice cream color and they are just adorable!  Cream table and cream slip covers...?  Too creamy.  Our counter is a dark green, so maybe a dark green, with a semi-gloss coat of poly-urethane to protect it?  Or dear husband might like a dark navy blue.  Or I'm really, really liking orange lately, so maybe a slightly burnt orange with the cream slipcovers...?  A quick search on google images didn't give me any inspiration photos to go from (or persuasion material for dear hubby), so I'll have to use the pictures in my head for inspiration.  Oh, the possibilities!

What do the pictures in your head look like?  Do share  :-)

Hugs,
Mary


Monday, January 9, 2012

What day is it again?

It is day 7 of the drunk milk experiment.  I guess it isn't really an experiment since I'm following a recipe, but it sure looks like a chemistry experiment.  Check it out for yourself:
Madame Charnushka says "Take no long walks off short piers."
The alcohol isn't separating from the rest of the stuff anymore, and bits of citrus pulp are now floating freely in the jug.  This has been the status quo for the last two days, and we've been busy, so there haven't been any updates over the weekend.  'Busy with what?' you ask..?
Cowabunga!
Busy-ness #1:  It snowed!  And we were the first ones at the sledding hill!  Notice how dark the photo is?  It was just after 8am.  The boys were raring to go at 7, but I made them wait.  Mommy needs a few moments to get going, especially on cold snowy mornings.

Busy-ness #2:  Friday nights are movie and pizza nights at our household.  This past Friday was a Digimon marathon, and to keep my sanity I tackled one of the projects that has been on my mind - a plastic bag organizer.
A bag bag!
I originally saw this on Martha Stewart ages ago, read the how to, then promptly did something else.  I recalled the basic instructions and winged it Friday as digimon were battling each other.  Here's what I did:

  • Grab a clean dish towel.
  • Using scissors, cut the two long seamed edges off.  I did not cut the corners off, thinking that the piece would be sturdier if I left the short seamed edges completely intact.  Save the seam pieces.
  • Fold in half, right side in, cut sides aligned.
  • At this point I hand stiched the cut sides together with about a 1/4" seam allowance.  I bet this would go much quicker with a sewing maching.
  • Make one slit on the inside of the bottom seam, at both ends, big enough for a small button to pass through. 
  • Using 1/4" satin ribbon left over from the Christmas stockings, I tied one end of a 2' length to a small button. My helper Nathan threaded the button in one hole, through the seam and out the hole at the other end.  We untied the button, cinched the seam so it was gathered up and had a smaller diameter than the rest of the bag, and tied the ribbon in a bow to hold the cinch.
  • Take the reserved seam pieces that were cut off and tie them into a bow, leaving long tails at one end.  Sew the tails to the top/uncinched part of the bag.
  • Turn bag right side out.  Fill with plastic bags.  Hang someplace conveniently useful yet out of sight.

I didn't do any of Martha's ironing or pinning, I used ribbon instead of elastic, and I didn't use cotton tape for the hanger.  Oops.  I still love it.  This will hang in the pantry as soon as husband puts up a hook. I was going to do it, but he wants to help, so I wait.

Busy-ness #3: A neighbor across the street had a baby last week, and I helped make dinner for her and her family.  Someone else brought meatballs, and I brought a salad and biscuits.  Not being able to make small portions of anything, there was enough for their family and ours.  I used Erin's Red Lobster Cheddar Bay Biscuit recipe at mythirtyspot.com, and they were delicious!  The salad had spinach, diced prunes, chopped toasted walnuts and asian dressing.  I meant to put mandarin oranges in too, but I don't have any cans of them, so they got the salad as-was.  After I brought the salad over, I realized I could just peel some cuties and throw them on top - it really made the salad.

Busy-ness #4:  I saw this on Pinterest, a post at Alphamom about making bento box lunches for kids.  Then I googled it and found so many images and links and whatnot, I was a little overwhelmed.  So this is what I accomplished this morning:
Nowhere near the cute perfection of Alphamom, but still tasty looking.
Now I have to get cute basic cookie cutter shapes to prettify my bento lunches.

Hasta la chow chow!
Mary


Friday, January 6, 2012

Drunk milk, days 3 and 4

So drunk milk progress day 3 looked like this:
Ewww.  Coagulation.

That white wall really needs a backsplash.
And I captured this this morning:
Day 4, bright and early
The concoction is slowly mushing down and getting nastier.  The citrus pieces used to be almost to the top of the jar, but they're slowly giving up.  The clear liquid at the bottom is becoming a little more amber colored each day.  The really interesting/gross feature is the chunky mess that clings to the top of the jar.  I wouldn't be surprised if there's an old gypsy out there somewhere that could read my future in that nastiness.  I haven't opened it - ugh!  Image what it smells like right now...

I will trust in the process and see this through to January 14.  Assuming the world doesn't end by then.  What is the last day of the Mayan calendar again?  I have a lot of crafting/cooking to do by then. Have you see Miss Amy's butterbeer cupcakes?  They look absolutely Delicious!  Delectable!  Delightful!  I MUST get to these before the world ends!

The world isn't ending today, unless I don't get snack made for the boys before they get home.  Today, it's apple slices and white-girl quesadillas.  Simplest thing going, these tortillas.

You'll need 
  • Flour tortillas
  • Shredded Cheese (mozzarella, co-jack, cheddar, mexican blend - your call!)
Put tortilla on a microwave safe plate.  Spread cheese on the tortilla.  Cover cheese with another tortilla.  Microwave for about thirty seconds.  The cheese should be stringy and sticky, holding the tortillas together.  Cut into quarters and serve.  Done.

Just about anything could be added.  Husband likes to use a mexican cheese blend and add some ground Penzey's ancho pepper before microwaving.  I like it with mozzarella, garlic pepper and slices of avocado.  The kids like just co-jack.  What would you eat on it?

No craftiness today, but I did pick up instruction packets on how to lead Meet the Masters at my children's school in two weeks.  We'll be imitating Faith Ringgold by creating multimedia masterpieces.  Now to buy some oil pastels so I have samples to display during class.

Mary

Wednesday, January 4, 2012

Drunk milk, day 2

This is day 2 of the Great Drunk Milk experiment.  How's it going, you ask...?

The milk wants to separate from the vodka, like church and state.
Guessing milk would be 'church' and vodka would be 'state'.
A quick shake mixed everything back up.  I seem to be shaking the jug (which I got from Ikea, by the way) about once every 12 hours.
Post shake.  Can you see the Mexican coke bottle on the sill?  A perfect place for it.
Now I'm off to peel potatoes for mashed potatoes.  Easiest thing, but in case you don't know how to make mashed potatoes, here's quick instructions.  It's really flexible too - use more milk for creamier spuds, less for thicker.  Use white pepper if a co-diner is averse to black pepper - it has a milder taste and isn't as visible.  
Ingredients
6 medium idaho potatoes
4-6 tablespoons butter
2 teaspoons of salt
1 teaspoon black pepper
1/4 cup milk (we use 2%)
Water for boiling

First peel and slice potatoes into 1/2 inch chunks.  As soon as a potato is sliced, place in a pot filled with about 1 inch of cool water.  Once all potatoes have been peeled and sliced, swish them in the cold water to remove the starchy potato juice,  Drain the starchy water and refill with clean water to cover the potatoes by about an inch.  Place the pot o potatoes over medium high heat and bring to boiling.  Boil over medium heat about 20 minutes, checking the potatoes for doneness after 15.  The potatoes are done when they can be easily mushed against the side of the pot.  Once mushable, but not falling apart, drain the cooking water and leave the potatoes in the pot.  Add the butter, salt and pepper and mash.  I usually use an old fashioned potato masher, but my family loves when I use the hand mixer to make the potatoes extra smooth and creamy.  When the potatoes are about halfway to your consistency preference, add the milk and finish mashing/mixing.  Et voila - potatoes acompli (I do not speak french.  Never had one lesson!).  Dish them up in a fancy bowl, or put the pot on a trivet on your dining table.

Bon appetit!


Tuesday, January 3, 2012

Craft and a recipe, two bits

Happy new year!  TOOT!

Any good resolutions out there?  I never make em because I never keep em, though I'd like to try skiing.  That can be my tentative 2012 resolution - to try skiing.  Cross country is more my speed, I think, and a neighbor mentioned the beginner slopes at Snowbird are free!  I thought equipment rental was super expensive, but he set me straight, should be less than $20/person/day.  The boys have a half day this Friday - I should make an effort to get us there right after school ;-)

To recap Christmas, I recorded myself reading to the far away niece and nephews, one book each (you can see one bedtime story here).  On the crafting front, the stockings got to niece and nephews *just* in time for Christmas morning - hoorah!
Noah's stocking got extra love
They got stuffed with candy, toys and a bundle of yarn for my sister.
Shipping was over $100 to get them there in time, however, so now I plan on crafting with time to spare.  Which leads me to my current project...  VALENTINES!

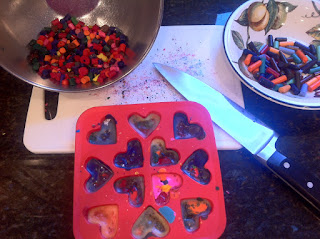
I'm working a Pinterest obsession right now, and I found these cutie patootie crayon hearts to make for valentine's day gifts.  They're pretty simple, but a little messy.

You will need:

  • one heart shaped mold (I got mine at Ikea, but I saw some at Target, too.  Can't find them on target.com tho.)
  • a tray for under the mold, to catch drips
  • crayons (according to several reviewers, crayola works best.  And metallics work really well.).  I'd guess I used about two crayons per mold, but that would depend on the mold used
  • oven
  • cooling rack

Instructions:

  • To make peeling the paper off of the crayons easier, soak them in water overnight
  • Cut out and decorate paper on which to mount the finished hearts.
  • Once the crayons are peeled, break them into thirds or quarters.  No need to mess up a cutting board or a knife ;-)
  • Preheat oven to 250 degrees fahrenheit
  • Place 1-2 crayons (3-8 pieces) into each heart shaped mold. It's OK if they are little mountains of crayons right now - they will melt down and fill in their own nooks and crannies.
  • Place filled molds on a jell roll pan (or some such), 
  • Bake 10-15 minutes, or until liquid
  • Remove from oven and let cool in the molds for, oh, 5 minutes or so.
  • Put in freezer for 10 minutes (I can be impatient...)
  • Remove molds from freezer.  Remove crayons from molds.  Repeat until you have all the hearts you want.
  • Hot glue hearts onto prepped paper 
  • Give to happy recipient!

Do NOT chop with a knife and board.  Unnecessary mess, and the  finished product is prettier with larger crayon pieces.
Nathan and the unglued valentines (the glitter glue wasn't dry yet).  I used small squares of white cardstock and smaller squares of red glitter construction paper.
While the valentines dry, I thought it would be fun to make this hooch recipe.  Today is day one and it looks like this:
Surrounding the jug are all the ingredients I used:  2 oranges, 1 lemon, 2 cups of milk, 2 cups of vodka and 2 cups of sugar.  Seal.  Shake once per day for ten days.  Strain and enjoy.  I'll try to post one picture per day to document the progress.  January 14 will be the final test.  Hmm...  what to serve it with...?  I'm leaning toward dark chocolate croissants.

TOOT!