Any good resolutions out there? I never make em because I never keep em, though I'd like to try skiing. That can be my tentative 2012 resolution - to try skiing. Cross country is more my speed, I think, and a neighbor mentioned the beginner slopes at Snowbird are free! I thought equipment rental was super expensive, but he set me straight, should be less than $20/person/day. The boys have a half day this Friday - I should make an effort to get us there right after school ;-)
To recap Christmas, I recorded myself reading to the far away niece and nephews, one book each (you can see one bedtime story here). On the crafting front, the stockings got to niece and nephews *just* in time for Christmas morning - hoorah!
 |
| Noah's stocking got extra love |
 |
| They got stuffed with candy, toys and a bundle of yarn for my sister. |
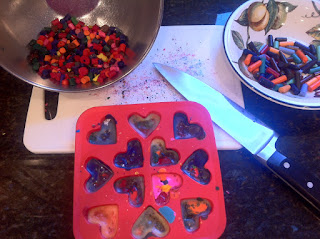
I'm working a Pinterest obsession right now, and I found these cutie patootie crayon hearts to make for valentine's day gifts. They're pretty simple, but a little messy.
You will need:
- one heart shaped mold (I got mine at Ikea, but I saw some at Target, too. Can't find them on target.com tho.)
- a tray for under the mold, to catch drips
- crayons (according to several reviewers, crayola works best. And metallics work really well.). I'd guess I used about two crayons per mold, but that would depend on the mold used
- oven
- cooling rack
Instructions:
- To make peeling the paper off of the crayons easier, soak them in water overnight
- Cut out and decorate paper on which to mount the finished hearts.
- Once the crayons are peeled, break them into thirds or quarters. No need to mess up a cutting board or a knife ;-)
- Preheat oven to 250 degrees fahrenheit
- Place 1-2 crayons (3-8 pieces) into each heart shaped mold. It's OK if they are little mountains of crayons right now - they will melt down and fill in their own nooks and crannies.
- Place filled molds on a jell roll pan (or some such),
- Bake 10-15 minutes, or until liquid
- Remove from oven and let cool in the molds for, oh, 5 minutes or so.
- Put in freezer for 10 minutes (I can be impatient...)
- Remove molds from freezer. Remove crayons from molds. Repeat until you have all the hearts you want.
- Hot glue hearts onto prepped paper
- Give to happy recipient!
 |
| Do NOT chop with a knife and board. Unnecessary mess, and the finished product is prettier with larger crayon pieces. |
 |
| Nathan and the unglued valentines (the glitter glue wasn't dry yet). I used small squares of white cardstock and smaller squares of red glitter construction paper. |
Surrounding the jug are all the ingredients I used: 2 oranges, 1 lemon, 2 cups of milk, 2 cups of vodka and 2 cups of sugar. Seal. Shake once per day for ten days. Strain and enjoy. I'll try to post one picture per day to document the progress. January 14 will be the final test. Hmm... what to serve it with...? I'm leaning toward dark chocolate croissants.
TOOT!

No comments:
Post a Comment